Using the report scheduler, you can run reports at prescribed times. Jobs that you define in the scheduler run the reports in the background and save the output in the repository. You can view the output there. You can also e-mail the output as an attachment. Any number of jobs can be scheduled for the same report.
Scheduled reports run showing data that the user who defines the job has permission to see (see Scheduling a Report). For example, Gloria has access only to inventory data from the Southeast US region. A report that she schedules shows data only from that region, even when the report is viewed by users in other regions. Other users must schedule the report themselves to see the data for their own regions.
Be careful when you schedule a job as an administrative user with no data restrictions. When the report runs, it contains all requested data in the data source, and any user that receives the report can view all the data regardless of the user’s access restrictions.
Standard data sources in the repository are not subject to access permissions, but Domains are (see The Domain Security File). The following data sources might be subject to access permissions:
• External data sources.
• Data sources authenticated by security frameworks other than the Acegi framework used by the server. For more information about the Acegi framework, see the JasperReports Server Administrator Guide.
In case of the latter, the server returns the data is received from the data source. Some data sources can pass access grants along with their data, others cannot. The user is responsible for configuring data passed to the server.
Only the user who created the schedule, or a user with the administrator role, can change or delete a schedule.
When you want to run a report repeatedly or at a particular time, schedule a job. Scheduled jobs appear in the repository with a ![]() icon beside the report name.
icon beside the report name.
To schedule a job, locate a report in the repository, right-click the report, and select Schedule Job from the context menu.
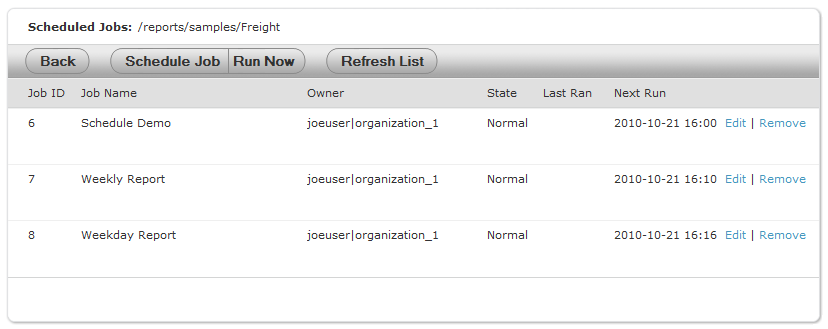
The scheduled jobs page appears for the chosen report:
|
|
Typical users see only the jobs that they have defined themselves; administrators see the jobs defined by all users. In the figure above, Joe User has scheduled three jobs for the Freight Report. The scheduled jobs page shows the following information for each job:
• Job ID – The internal ID number of the job, accompanied by a link to edit the job details.
• Job Name – A short description provided when creating the job.
• Owner – The user who created the job.
• State:
• Normal – The job is scheduled.
• Running – The job is currently running.
• Complete – The job is complete.
• Error – The scheduler encountered an error while scheduling or triggering the job. This does not include cases where the job is successfully triggered, but an error occurs while it runs.
• Last ran – The last time the report ran.
• Next run – The next time the report is scheduled to run.
• Edit – Select to change the schedule.
• Remove – Select to cancel the scheduled job.
When the server receives a request to delete a job that is running, the server completes running the job before deleting it.
Buttons on the Scheduled Jobs page include:
|
Button |
Description |
|
Back |
|
|
Schedule Job |
Opens the Job Details page to define a new job. |
|
Run Now |
Runs the report in the background, allowing you to continue working in the server. See section Running a Job in the Background. |
|
Refresh List |
Refreshes the list of jobs, for example to see if a job has finished running. |
| 1. | On the Home page, click View Your Reports; or from any page, click View > Reports. |
| 2. | Use the search field or browse the list of reports to find the report you want to schedule. |
|
|
If the report already has a schedule that you want to add, modify, or delete, click the small icon beside the report name. |
| 3. | Right-click the report and select Schedule from the context menu. |
The Scheduled Jobs page appears, as shown in Jobs Scheduled Page for a Sample Report.
| 4. | Click Schedule Job. |
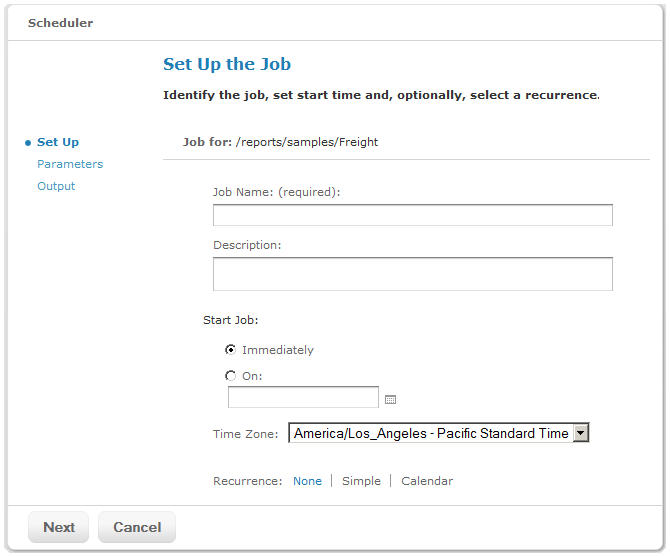
The Set Up the Job page of the Scheduler wizard appears.
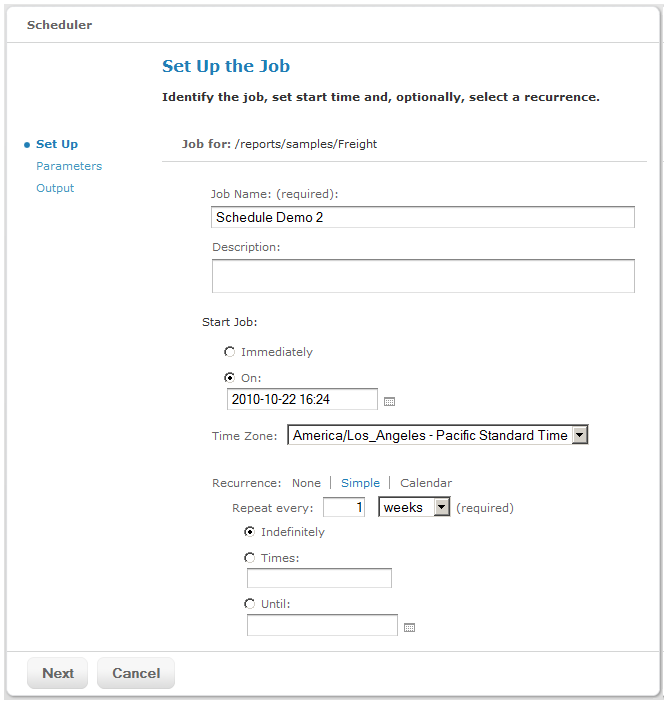
| 5. | In the Job Name field, enter a name for the job. The description is optional. |
| 6. | Set the following schedule attributes: |
• Start – Immediately or in the future. Click the calendar icon to select a future start date and time. If you do not specify recurrence below, the start date and time define when the report runs. If you specify recurrence, you may still want to delay the first report date, for example a weekday report that you want to start next week.
• Time Zone – Specify the time zone in which you want to define the schedule. The default time zone is the time zone of the server, the time zone you entered at log in. If you are in a different time zone, set this field accordingly.
• Recurrence – Choose one of the following:
None – Run the report once.
Simple – Schedule the job to recur at an hourly, daily, or weekly interval.
Calendar – Schedule the job to recur on days of the week or days of the month.
See "Set Up the Job Page for Scheduling a Report" shows a job set to run immediately, no recurrence:
|
|
In this example, schedule the new job to start on a fixed date and run only once. If you select Simple or Calendar Recurrence, additional controls appear on the page. For details, see section Specifying Job Recurrence.
| 7. | Click Next. |
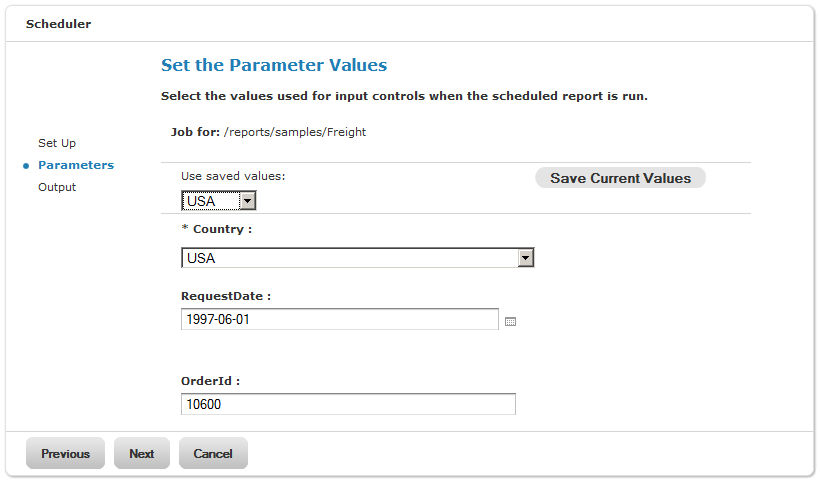
If the report you are scheduling has input controls that prompt for user input, the Set the Parameter Values page appears:
|
|
Saved values, if there are any, appear in a drop-down list at the top of the page. In Use Save Values, you can set the input controls defined for the report you are scheduling. You can set the input values for the scheduled report, and click Save Current Values to save the input value as a named set of values. For more information about using saved values and saving input values, see section Running a Report with Input Controls or Filters.
| 8. | Choose a set of saved values, or set the input controls. This example uses the saved values for USA. |
| 9. | Click Next. |
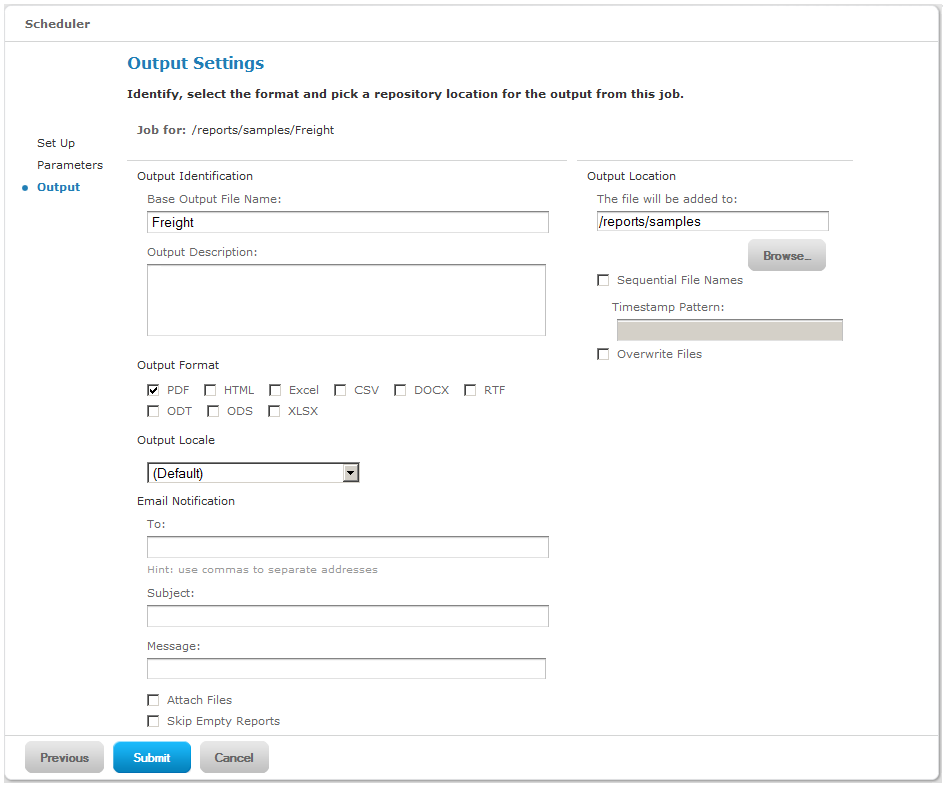
The Output Settings page appears:
|
|
| 10. | On the Output Details page, specify these attributes as needed: |
• Base Output File Name – The name of the file as it appears in the repository, not including the file extension. The timestamp pattern can be added to the base name, and the format extension is added automatically.
• Output Description – The optional description for the file as it appears in the repository.
• Output Format – The available output formats. Select at one, or accept the default format, PDF. When you select more than one, each format is stored as a separate file in the repository and attached as a separate file to the email notification.
• Output Locale – The locale settings for generating the report.
The report must support locales, for example a report based on a Domain with language bundles (see section Security and Locale Information for a Domain).
• To – One or more email addresses separated by commas for sending email notification. By default, no mail server is configured in a JasperReports Server installation. To send notifications, the administrator must configure one, as described in the JasperReports Server Administrator Guide.
• Subject – The subject line of the notification email.
• Message – Content of the notification email.
• Attach Files – An check box option that, if checked, sends the output of the report with the email notification.
|
|
Be careful when sending reports containing sensitive data by email. |
• Skip Empty Reports – A check box option that, if checked, prevents the server from attaching empty report output files to email notification when report execution fails.
• Output Location– The folder for saving the report output. This field is required and you must have write permission to the folder. If you email the report and do not want to save it, specify the Temp folder.
• Sequential File Names – Appends a timestamp to the names of files created by the job. Useful for the output of recurring jobs or for time-sensitive reports where the output must be dated. When the timestamp is used, the output filename is <basename>-<timstamp>.<extension>.
• Timestamp Pattern – An optional pattern for the timestamp, based on the java.text.SimpleDateFormat. Valid patterns for report output files can only contain letters, numbers, dashes, underscores, and periods. The default pattern is yyyyMMddHHmm, for example 200906150601.
For more information about the valid patterns for this field, refer to:
http://java.sun.com/j2se/1.4.2/docs/api/java/text/SimpleDateFormat.html
• Overwrite Files – An check box option that, if checked, overwrites old output files with newer ones of the same name. Useful when you do not have sequential filenames, or you specify a timestamp pattern that may lead to identical filenames.
| 11. | Click Submit. |
The job appears in the list of scheduled jobs (see Viewing Scheduled Jobs).
| 12. | In the list of jobs, verify that the next run time for the new job is the date and time you want. |
When the start date for a job has passed, start a new job rather than changing the start date.
| 1. | Open the Jobs List page for the report, as described in section Viewing Scheduled Jobs. |
| 2. | Click Edit in the row of the job you want to change. |
| 3. | Make the changes on the Job Details, Schedule, Parameters, and Output pages. |
| 4. | Click Save. The update occurs immediately. |
| 5. | In the list of jobs, verify that the next run time for the job is the new date and time you want. |
To stop a job from running, delete it.
To delete a scheduled job:
| 1. | Open the Jobs List page for the report, as described in section Viewing Scheduled Jobs. |
| 2. | In the row of the job you want to delete, click Remove. |
You select simple recurrence or calendar recurrence to run reports automatically on a regular basis. You specify when the job starts, how often it repeats, and when it ends.
Simple recurrence repeatedly runs the job at an hourly, daily, or weekly interval, and is quick to set up.
|
|
|
Schedule Page With Simple Recurrence |
Simple recurrence supports these options:
• Start Job – With simple recurrence, the start date and time determines the date and time of all occurrences, according to the chosen interval.
For example, if you want to run the job every Monday, set the start date to the first Monday.
• Recurrence – Determines how many times or for how long the job repeats.
• Every – The interval between jobs, in minutes, hours, days, or weeks.
• Indefinitely – Runs until you delete the job.
• Times – Runs the specified number of times.
• Until – Runs until a calendar date is reached. Click the calendar to select the date.
|
|
If your servers recognize Daylight Savings Time (DST), jobs scheduled using simple recurrence may seem to occur one our later (when DST ends) or one hour earlier (when DST begins). If you want jobs to recur at the same time of day and respect DST adjustments, use calendar recurrence. |
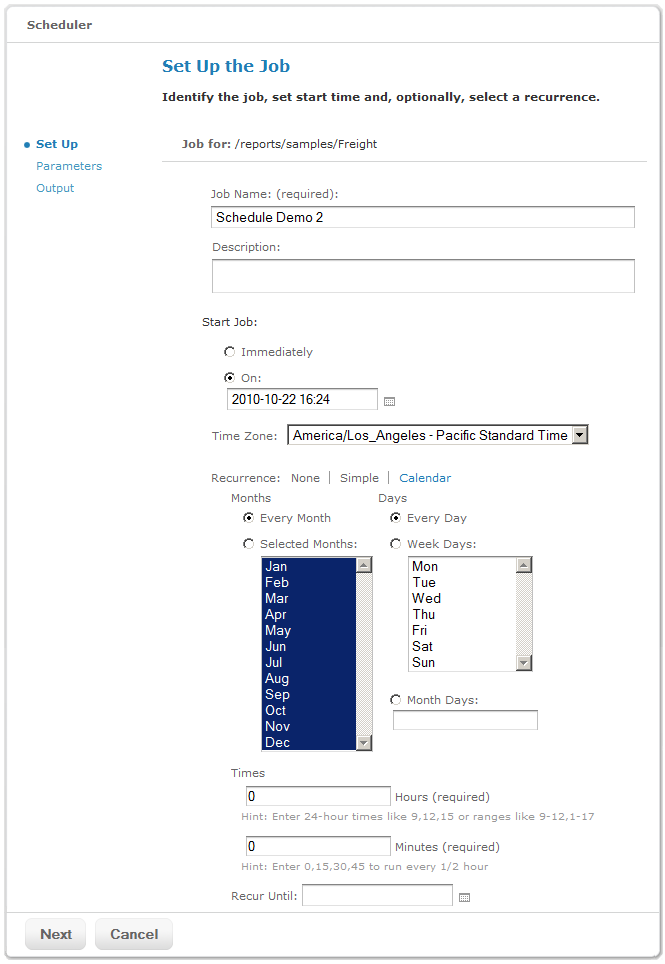
Using calendar recurrence, you define a job’s recurrence at a higher level of detail, including the time of day, days of the week, or days of the month, and months of the year.
Calendar recurrence supports these options:
• Months – Choose the months during which the report runs.
• Days – Choose the days when the report runs:
• Every Day.
• Week Days – Choose the days of the week.
• Month Days – Enter dates or date ranges separated by commas, for example: 1, 15.
• Times – Set the time of day in minutes and hours when the job should run. The hours use 24-hour format.
You can also enter multiple minutes or hours, as well as ranges, separated by commas. For example, entering 0, 15, 30, 45 for the minutes, and 9-17 for the hours, runs the report every 15 minutes from 9:00 a.m. to 5:45 p.m. Enter an asterisk (*) to run the job every minute or every hour.
• Recur Until – Calendar recurrence runs until a calendar date is reached. Click the calendar to select the date.
See "Schedule Page With Calendar Recurrence" shows an example of calendar recurrence settings:
|
|
Running a job in the background generates a report, potentially a long-running one, without causing delays in the server user interface. You can keep working in the server as the job runs in the background. When the job completes, you can export the report directly to any format and save it in the repository. You can quickly share a report with others by sending the generated report by email.
Running a job in the background is equivalent to scheduling the report to run immediately without recurrence.
To run a job in the background:
| 1. | On the Home page, click View Your Reports; or from any page, click View > Reports. |
| 2. | Use the search field or browse the list of reports to find the report you want to run. |
| 3. | Right-click the report and select Run in Background from the context menu. |
| 4. | If the report you are running has input controls or filters that prompt for user input, the Parameter page appears, as in Set the Parameter Values Page for Scheduling a Report. Choose a set of saved values, or set the fields one at a time. |
| 5. | Click Next. |
The Output page appears as in Output Page for Scheduling a Report. Enter the information as described in See "On the Output Details page, specify these attributes as needed:".
| 6. | Click Save. |
The report begins to run immediately and, when finished, stores or sends the output as directed on the Output page. In the meantime, you can continue working in the server.
When the report scheduler runs a report, a built-in parameter named _ScheduledTime can pass the date and time the report was scheduled to the report. You can use this parameter in a report by declaring it in the JRXML using this syntax:
<parameter name="_ScheduledTime" class="java.util.Date"/>
Use the _ScheduledTime value to display the date the report was run.