Setting a System Theme
Themes are sets of CSS and image files stored in a folder in the repository. The root of the repository and every organization has a Themes folder where active and inherited themes are stored. In the repository browser, the Themes folder and individual theme folders have special actions for administrators to manage them. You can also use the repository search to find CSS and image files.
The folders and actions for managing themes are visible only to administrators. The Themes folder has execute-only permission for ROLE_USER so that all users can load the theme files and see the user interface, but not access the folders and files in the repository.
This section gives the basic procedures for administering existing themes, and for creating and modifying new theme folders. For information about how to work with CSS in themes, see section Working With CSS Files.
1. Log into JasperReports Server as system administrator (superuser).
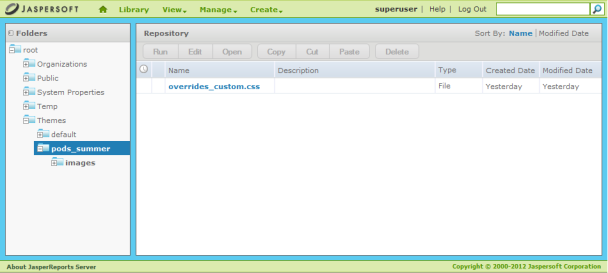
2. Click View Repository and expand the Themes folder if necessary.
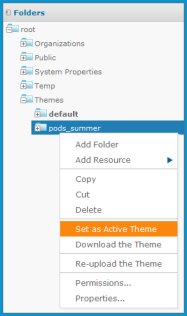
3. Right-click the new theme folder and select Set as Active Theme.
For example, the sample data includes a second theme called pods_summer that you can set as active.
|
|
|
Setting a System Theme |
As soon as the screen is refreshed, you see the effect of the new theme. Notice how the pods_summer theme changes the colors and the logo in the user interface with just the overrides_custom.css file and images.
|
|
|
The Sample Theme pods_summer |
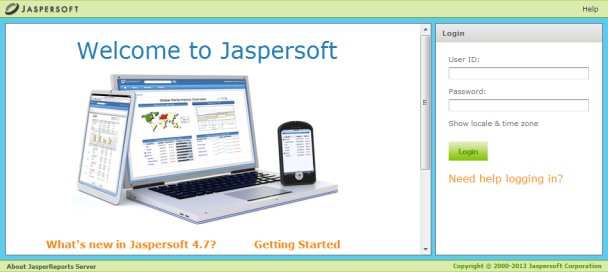
Because the system theme is set at the root level, the new theme appears to all users in all organizations, unless the organization has its own theme. Also, the system theme set here applies to the login page, as shown in the following figure.
|
|
|
The Login Page as Seen With the New System Theme |
The following procedures assume that the system theme is still set to the default theme.
1. Log into JasperReports server as the organization admin (jasperadmin).
In a server licensed to use multiple organizations, specify the organization ID or alias on the login page.
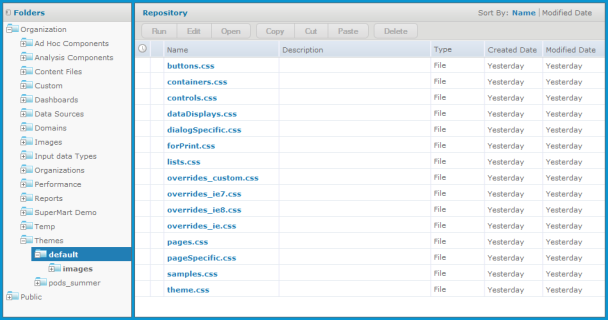
2. Click View Repository and expand the Themes folder if necessary. The organization’s Theme folder is shown in See "Organization Themes Seen by Organization Admin".
3. Right-click the new theme folder name and select Set as Active Theme.
As soon as the screen is refreshed, you see the effect of the new theme. The new theme applies to all organization users and is inherited by all suborganizations, if any.
Organization admins can thus customize the user interface by creating and activating new themes within their organization.
|
|
System admins may want to restrict access to themes, so that all themes are controlled from the system level.
|
|
This procedure only applies to system admins. Organization admins cannot modify the ROLE_ADMINSTRATOR permission, even in suborganizations. They must request that the system admin perform the procedure for them. |
1. Log into JasperReports Server as system administrator (superuser).
2. Click View Repository and expand the Organizations folder.
3. Locate the name of the organization where you want to restrict access to themes and expand its folder.
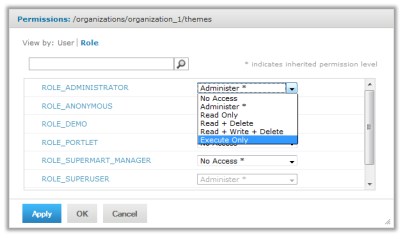
4. Right-click the organization’s Themes folder name and select Permissions.
5. Change the permission for the ROLE_ADMINISTRATOR from Administer to Execute Only.
|
|
|
Restricting jasperadmin Access to Organization Themes |
By setting Execute Only access, the organization admins cannot see the Themes folder in the repository, and thus cannot change themes or create a new theme.
|
|
You shouldn’t change any other permissions on themes, even if the permissions dialog allows it. You could inadvertently make the user interface inaccessible. |
6. To restrict access to all organizations, repeat See "Locate the name of the organization where you want to restrict access to themes and expand its folder." to See "Change the permission for the ROLE_ADMINISTRATOR from Administer to Execute Only." for every organization in the server, including suborganizations.
7. If you want to restrict access in the same way in all future organizations, repeat See "Right-click the organization’s Themes folder name and select Permissions." and See "Change the permission for the ROLE_ADMINISTRATOR from Administer to Execute Only." in the Folder Template of every organization and suborganization in the server. Fore more information, see section Placing Themes in the Folder Template.
There are three ways to create the folders and files that make up a theme:
• Create them directly as resources in the repository.
• Download and upload themes as ZIP (archive) files.
• In multi-organization deployments, placing theme folders in the Folder Template.
This section explains only how to store CSS files in the repository. For information about creating CSS file contents, see section Working With CSS Files.
A theme is simply a folder in the repository that contains CSS and image files, with optional sub-folders. Administrators can use the repository menus to create theme folders. System admins can create theme folders and files at the system level or in any organization. Organization admins can create theme folders and files in their organization or any suborganization.
To create theme folders and file resources:
1. Log in as an administrator with access to the location where you want to place the theme.
2. Click View Repository and expand the folder tree to view the Themes folder where you want to place the theme.
3. Right-click the Themes folder and select Add Folder. Give your folder a name and optional description as you would when creating any folder. The folder name is used as the name of the theme.
|
|
Theme folders and files can be created, copied or moved anywhere in the repository, but they can only be made active, uploaded, or downloaded when properly placed in a Themes folder. |
4. Right-click your new folder and select Add Resource File CSS, and use the dialog to upload an individual CSS file. In order to be used as part of a theme, it must be one of the file names listed in section Theme Files.
5. To add images to your theme, create any image folders and upload image files with Add Resource File Image.
6. Repeat See "Right-click your new folder and select Add Resource File CSS, and use the dialog to upload an individual CSS file. In order to be used as part of a theme, it must be one of the file names listed in section Theme Files." and See "To add images to your theme, create any image folders and upload image files with Add Resource File Image." to create all the files and images you need. If several themes use the same files or images, you can copy-paste the file resources or entire image folders from one theme to another.
7. If you need to change the contents of a CSS or image file, you can right-click it and select Edit to specify another file to upload and replace the current file.
|
|
If you upload CSS and image files into the active theme, the changes are visible after reloading the page in your browser. |
Interacting with theme folders and files through the repository is a convenient and flexible way to create a theme. However, this method suffers from the limitation that, like other repository resources, you cannot download the files or images to edit them. For this purpose, the repository provides special download and upload actions on theme folders.
The process of creating a theme often starts with the files of an existing theme that you modify with CSS and image editors on your computer. To support this workflow, every Themes folder has special commands for downloading and uploading themes.
Because a theme is composed of any number of files and folders, JasperReports Server uses the ZIP archive format to store a theme in a single file.
1. Log in as an administrator with access to the theme you want to download.
2. Click View Repository and expand the Themes folder if necessary.
3. Right-click the theme folder you want to download and select Download the Theme. This menu selection appears only on theme folders inside the Themes folder.
4. The server prompts you to save the file named <theme-name>.zip. Save it anywhere on your computer.
5. Use an archiving or compression utility to extract the files from the ZIP file and save them on your computer.
Once you have the theme files extracted on your computer, you can view the individual CSS and image files that make up the theme. For example, to create your own theme, start by downloading the default theme from the root/Themes folder (as superuser). Save the extracted file on your computer and create your custom theme in another folder by copying and editing the CSS files and images of the default theme. See section CSS Priority Scheme and Custom Overrides for an explanation of how to create a theme.
When you have created all the files you need in your theme, upload it with the following procedure.
To upload a ZIP file as a theme:
1. Place the CSS files, optional folders, and images files that constitute your theme in a folder on your computer.
2. Use an archiving or compression utility to create a standard ZIP file of the contents of your theme folder.
|
|
The ZIP file should include only the contents of your theme, not the theme folder itself. |
1. Log in as an administrator with access to the location where you want to upload the theme.
2. Click View Repository and expand the Themes folder if necessary.
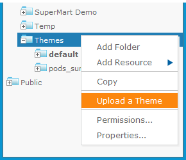
3. Right-click the Themes folder and select Upload a Theme.
|
|
|
Uploading a Theme in an Organization |
4. In the dialog that appears, enter a name for your theme, which becomes the name of its folder, and browse to find the ZIP file on your computer. Click Upload.
|
|
You cannot use the ZIP upload dialog to overwrite an existing theme. You must specify a theme name that doesn’t already exist in the chosen Themes folder. |
The server uploads your ZIP file and extracts it contents. Then it creates a folder for the new theme and creates file resources in the folder for each of the CSS and images in your ZIP file. If you had sub-folders in your theme, they are created as well. After uploading your theme ZIP file, you can make it active to see effect of your theme on the user interface.
Creating a theme is an interactive process where you often need to make changes until you have the look and feel you want. To support this process, uploading ZIP files can be combined with the uploading of individual file resources that is described in section Creating Theme Folders and File Resources. In fact, after an initial upload, it is much easier to update individual files in this way than to create the ZIP file and upload it again.
In deployments licensed to use multiple organizations, you can place a theme in the Folder Template that is used to create new organizations. The theme folder and all of its contents are copied to the Themes folder of any new organizations that are created. Upon creation, new organizations always inherit their theme from the parent organization, but having a custom theme already present can save you time when customizing and activating it for the new organization.
The Folder Template in every organization contains a Themes folder and an empty default folder. Do not modify the empty default folder, but create a new theme folder instead and place your files there. Because the Folder Template does not contain an active theme, there is no Upload Theme menu option on its Themes folder. Instead create the folder for your theme and upload files as resources, or copy an entire theme folder from the parent organization’s Themes folder.
If you want to restrict access to the themes in created organizations, you can also set the permissions on the Themes folder in the Folder Template. To do this, follow the procedure in section Restricting Access to Themes.