Open topic with navigation
Data Sources
A data source is a resource in the repository that defines how and where to obtain the data displayed by reports or OLAP views. Typically, it includes the location of the data and the details you need to access it, such as a user name and password. For example, to access an RDBMS (Relational Database Management System) that stores your data, you would create a data source that included the URI of the database server and user credentials.
JasperReports Server can access any database using the JDBC (Java DataBase Connectivity) API. Most database vendors provide a JDBC driver to access their product, for example DB2, MySQL, Oracle, PostgreSQL, and Vertica (to name but a few). In this case, you can configure two types of data sources in the repository:
• JDBC data source – Establishes a direct connection to the database server using its JDBC driver. JasperReports Server configures and manages the connections to the database. By default, the maximum number of simultaneous connections for each data source is five.
• JNDI data source – Calls the JNDI (Java Naming and Directory Interface) service of the application server to locate a database connection. The application server manages the connections to the database and shares them between all applications that it hosts. The configuration of the application server determines the number of connections that are shared. Note that the application server connects to the database using JDBC, meaning that JNDI data sources return results in the same format as JDBC data sources.
JasperReports Server also supports big data in Apache Hadoop clusters accessed through Apache Hive. Because Hive uses the Hive Query Language (HiveQL) that is similar to SQL but distinct, it has its own data source type. In the same way, MongoDB is another big data product that the server can access through a custom data source type that is provided. In addition, JasperReports Server supports custom-made report data sources in the form of JavaBeans-based data sources. This section discusses JDBC, JNDI, Hadoop-Hive, MongoDB, and bean data sources.
In the case of analysis data, JasperReports Server supports OLAP data sources (such as Mondrian and XML/A connections). For information about analysis data sources, refer to the Jaspersoft OLAP Ultimate Guide.
|

|
You can extend JasperReports Server to support any custom data source. Custom data sources consist of Java implementation classes, a message catalog, and a Spring bean definition. For more information about custom data sources, see the JasperReports Server Ultimate Guide.
|
JDBC Data Sources
To access an RDBMS from JasperReports Server using JDBC you must have a driver, which must be accessible in the server’s classpath. Jaspersoft provides a number of JDBC drivers for popular databases. These drivers are available directly in the installed product and do not require further configuration. For more information on JDBC drivers, refer to the JasperReports Server Installation Guide.
When configuring a new JDBC data source that points to new types of database server, you should make sure that the JDBC driver you are using is available in the classpath of the JVM that launches the server. The driver cannot be added on the fly from the user interface; it must already be in the classpath when the server starts before you can use it in a data source.
If you need to add a new JDBC driver, it should be placed in the application server’s library folder, which is already in the JVM’s classpath. For example, if you use the Tomcat application server bundled with JasperReports server, place the driver file in <tomcat>/lib, which corresponds to <js-install>\<application-server-path>\lib. For example, if you installed the server from the installation executable on Windows, the path is C:\Program Files\jasperreports-server-x.x\apache-tomcat\lib.
To add a JDBC data source:
1. Log on as an administrator.
2. Click View Repository and expand the folder tree to locate the folder in which you want to create the data source. If you installed the sample data, the suggested folder is Data Sources.
3. Right-click the folder and select Add Resource Data Source from the context menu.
The Add Data Source page appears.
4. In the Type field, select JDBC Data Source.
5. Fill in the other required fields, along with any optional information. The following table shows typical values for the driver and URL of common databases:
|
Database
|
Driver and URL
|
|
Microsoft SQL Server
|
com.microsoft.sqlserver.jdbc.SQLServerDriver
jdbc:sqlserver://<host>:1433;databaseName=<database>
|
|
Microsoft SQL Server with jTDS driver
|
net.sourceforge.jtds.jdbc.Driver
jdbc:jtds:sqlserver://<host>:1433/<database>
|
|
MySQL
|
com.mysql.jdbc.Driver
jdbc.mysql://<host>:3306/<database>
|
|
Oracle (thin driver)
|
oracle.jdbc.OracleDriver
jdbc:oracle:thin:@<host>:1521:<database-instance>
|
|
PostgreSQL
|
org.postgresql.Driver
jdbc:postgresql://<host>:5432/<database>
|
|
Vertica
|
com.vertica.jdbc.Driver
jdbc:vertica://<host>:5433/<database>
|
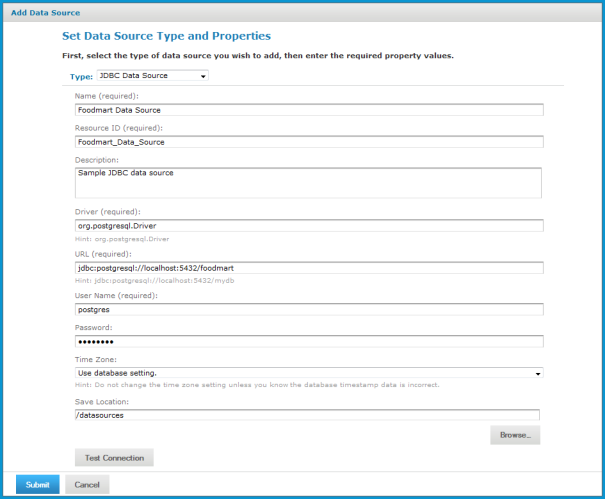
The following figure shows values for connecting to the sample Foodmart database included in the sample data.
|
|
Set the Time Zone field when the datetime values stored in the target RDBMS do not indicate a time zone. When datetime values are stored in a format other than local time zone offset relative to Greenwich Mean time (GMT), you must specify a time zone so that the server can convert datetime values read from the target database properly. Set the Time Zone field to the correct time zone for the data in the data base.
When in doubt, leave the Time Zone field blank.
The list of time zones is configurable, as described in theJasperReports Server Administrator Guide.
|
6. Click Test Connection to validate the data source. If the validation fails, ensure that the values you entered are correct and that the database is running. Also, see the troubleshooting section of theJasperReports Server Administrator Guide.
7. When the test is successful, click Submit. The data source appears in the repository.
JNDI Data Sources
Adding a JNDI data source is very similar to adding a JDBC data source. The JNDI data source points to an existing connection that is defined in the application server and published as a JNDI resource or service. Instead of specifying a driver and database as you do with JDBC data sources, you only need to specify the JNDI service name in your application server.
|
|
Application servers use JDBC connections themselves to expose a database through JNDI. You must specify the JNDI service name of a JDBC connection.
|
For information about setting up a JNDI connection in your application server, see the JasperReports Server Administrator Guide.
To add a JNDI data source:
1. Log on as an administrator.
2. Click View Repository and expand the folder tree to locate the folder in which you want to create the data source. If you installed the sample data, the suggested folder is Data Sources.
3. Right-click the folder and select Add Resource Data Source from the context menu.
The Add Data Source page appears.
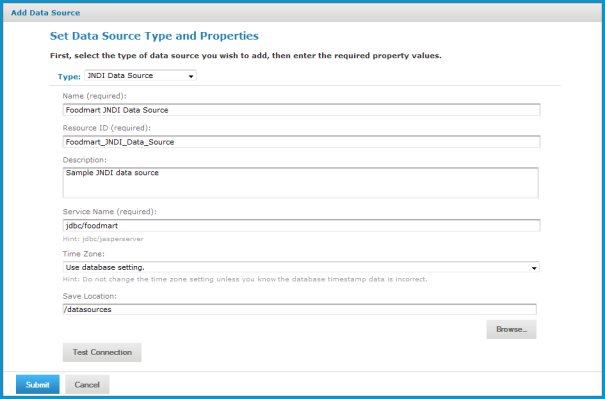
4. In the Type field, select JNDI Data Source.
The information on the page changes to reflect what’s needed to define a JNDI data source.
5. Fill in the required fields, along with any optional information.
The service name is the name that the application server exposes through JNDI. The following figure shows values for connecting to the JNDI service for the Foodmart database included in the sample data.
|
|
Set the Time Zone field when the datetime values stored in the target RDBMS do not indicate a time zone. When datetime values are stored in a format other than local time zone offset relative to Greenwich Mean time (GMT), you must specify a time zone so that the server can convert datetime values read from the target database properly. Set the Time Zone field to the correct time zone for the data in the data base.
When in doubt, leave the field blank.
The list of available time zones is configurable, as described the JasperReports Server Administrator Guide.
|
6. Click Test Connection to validate the data source. If the validation fails, ensure that the values you entered are correct, that the database is exposed through JNDI, and that the database is running. Also, see the troubleshooting section in the JasperReports Server Administrator Guide.
7. When the test is successful, click Submit. The data source appears in the repository.
For details about configuring a JNDI database connection at the application server level and making it available to the server’s applications, refer to the documentation provided with your application server. In particular, see the troubleshooting instructions in the JasperReports Server Administrator Guide.
Hadoop-Hive Data Sources
Unlike traditional databases, Hadoop systems support huge amounts of data, often called big data. But this capability has a cost: high latency with access times on the order of 30 seconds up to 2 minutes. As a result, Hadoop-Hive data sources have certain limitations and guidelines for use in JasperReports Server:
• Hadoop-Hive data sources are not suitable for OLAP connections.
• Hadoop-Hive data sources are not suitable for creating reports interactively in the Ad Hoc Editor.
• Reports based on Hadoop-Hive are not suitable for dashboards.
• Filters and query-based input controls that rely on Hadoop-Hive data sources will be slow to populate the list of choices.
• You must configure your query limits and timeout to handle latency (see section Configuring Ad Hoc OLAP Filters).
• You must configure your JVM memory to handle the expected data (see the JasperReports Server Installation Guide).
In general, reports based on Hadoop-Hive data sources are best suited to be run in the background from the repository. For very large reports, consider scheduling them to run at night so the output is available immediately when you need it.
To add a Hadoop-Hive data source:
1. Log on as an administrator.
2. Click View Repository and expand the folder tree to locate the folder in which you want to create the data source. If you installed the sample data, the suggested folder is Data Sources.
3. Right-click the folder and select Add Resource Data Source from the context menu.
The Add Data Source page appears.
4. In the Type field, select Hadoop-Hive Data Source.
The information on the page changes to reflect what’s needed to define a Hadoop-Hive data source.
5. Fill in the required fields, along with any optional information.
The Hive JDBC URL has the form: jdbc:hive://<hostname>:10000/default
6. When done, click Submit. The data source appears in the repository.
MongoDB Data Sources
MongoDB is a big data architecture based on the NoSQL model that is neither relational nor SQL-based. Jaspersoft provides a connector that allows reports to use MongoDB as a data source. Reports based on a MongoDB data source can be used as Topics that allow users to create Ad Hoc views based on the fields returned by the MongoDB query. However, Domains require relational data sources, and therefore MongoDB data sources cannot be used in Domains.
To add a MongoDB data source:
1. Log on as an administrator.
2. Click View Repository and expand the folder tree to locate the folder in which you want to create the data source. If you installed the sample data, the suggested folder is Data Sources.
3. Right-click the folder and select Add Resource Data Source from the context menu.
The Add Data Source page appears.
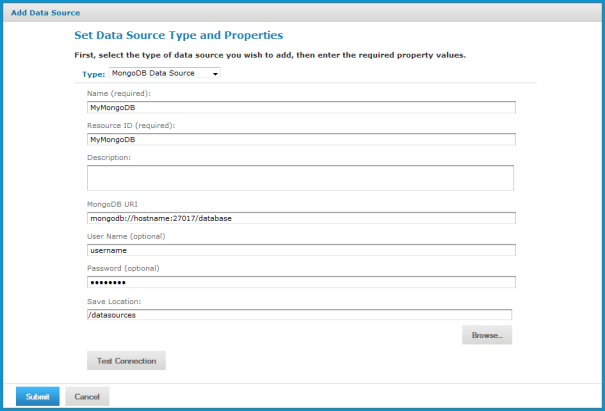
4. In the Type field, select MongoDB Data Source.
The information on the page changes to reflect what’s needed to define a MongoDB data source.
5. Fill in the required fields, along with any optional information.
The MongoDB URL has the form: mongodb://<hostname>:27017/<database>
6. When done, click Submit. The data source appears in the repository.
MongoDB is designed to be accessed through API calls in an application or a command shell. As a consequence, it does not have a defined query language. In order to write queries for MongoDB data sources, Jaspersoft developed a query language based on the JSON-like objects upon which MongoDB operates. JSON is the JavaScript Object Notation, a textual representation of data structures that is both human- and machine-readable.
The Jaspersoft MongoDB Query Language is a declarative language for specifying what data to retrieve from MongoDB. The connector converts this query into the appropriate API calls and uses the MongoDB Java connector to query the MongoDB instance. The following examples give an overview of the Jaspersoft MongoDB Query Language, with SQL-equivalent terms in parentheses:
• Retrieve all documents (rows) in the given collection (table):
|
{ 'collectionName' : 'accounts' }
|
• From all documents in the given collection, select the named fields (columns) and sort the results:
|
{
'collectionName' : 'accounts',
'findFields' : {'name':1,'phone_office':1,'billing_address_city':1,
'billing_address_street':1,'billing_address_country':1},
'sort' : {'billing_address_country':-1,'billing_address_city':1}
}
|
• Retrieve only the documents (rows) in the given collection (table) that match the query (where clause). In this case, the date is greater-than-or-equal to the input parameter, and the name matches a string (starts with N):
|
{
'collectionName' : 'accounts',
'findQuery' : {
'status_date' : { '$gte' : $P{StartDate} },
'name' : { '$regex' : '^N', '$options' : '' }
}
}
|
The Jaspersoft MongoDB Query Language also supports advanced features of MongoDB such as map-reduce functions and aggregation that are beyond the scope of this document. For more information, see the language reference on JasperForge.org.
Bean Data Sources
The bean data source type is a key extension because it allows you to make use of any custom or exotic data that you might need to report on. Bean data sources serve as a bridge between a Spring-defined bean and a JasperReport. The Spring bean is responsible for providing the data or parameters that fill the report.
To use a bean data source, you must first configure the underlying Spring bean and make it available in the server’s web application context. For example, you would add a bean definition to one of the WEB-INF/applicationContext*.xml files.
The bean must resolve to a ReportDataSourceService instance, either directly or by way of a factory no-argument method. You can use any Spring instantiation method (for example, a constructor or factory) and bean scope (for example, singleton or prototype) for the data source service bean.
The ReportDataSourceService instance is responsible for supplying data source parameters to the JasperReport. Custom ReportDataSourceService implementations can follow two approaches:
• If the implementation can provide the data to be used to fill a report, it needs to wrap the data into a suitable JRDataSource implementation and pass the data using the REPORT_DATA_SOURCE report parameter.
• If the data comes from the report query by way of a JasperReports query executor, the data source service must set values for the connection parameters defined by the query executor. The connection parameters are usually obtained from the properties of the data source service instance.
For example, you could implement a Hibernate data source service that would be injected in a session factory. The factory would create a Hibernate session that would be passed as a value for the HIBERNATE_SESSION parameter. The JasperReports Hibernate query executor then uses the parameter to run the HQL report query.
The ReportDataSourceService interface contains two methods: setReportParameterValues and closeConnection. The former provides data and connection parameter values; the latter is required to close and release any resources or connections created during the call to setReportParameterValues.
Once the data source service bean is available through Spring, you can add the bean data source to the repository.
To add a bean data source:
1. Log on as an administrator.
2. Click View Repository and expand the folder tree to locate the folder in which you want to create the data source. If you installed the sample data, the suggested folder is Data Sources.
3. Right-click the folder and select Add Resource Data Source from the context menu.
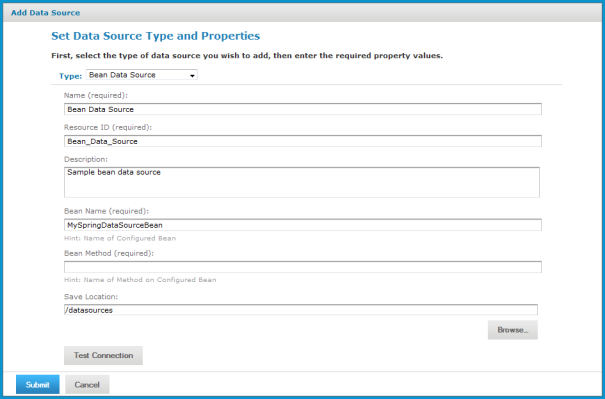
The Add Data Source page appears, as shown in Bean Data Source Page.
4. In the Type field, select Bean Data Source.
The information on the page changes to reflect what’s needed to define a bean data source.
5. Fill in the required fields, along with any optional information.
If the data source service is to be instantiated through a factory method of the Spring bean, you should also enter the name of the method.
6. Click Test Connection to validate the data source.
If the validation fails, ensure that the values you entered are correct and that the bean is in the classpath.
7. When the test is successful, click Submit.
Open topic with navigation