Roles define sets of users who are granted similar permissions. Administrators create roles, assigned them to users, and set permissions in the repository (see section Permissions). By default, JasperReports Server includes the following roles; some are needed for system operation, some are included as part of the sample data:
Except for the five special system-level roles visible in every organization, roles are defined within organizations. The same role ID can be defined in separate organizations, as long as it is unique within each organization. Admins can manage all roles in their organizations and any suborganization, but they can never see roles in a parent or sibling organization. JasperReports Server enforces this scheme to ensure that organizations are secure and only valid roles are assigned to users.
It is possible for an administrator to assign a role to a user in a suborganization, where the role is defined in a parent organization of the user. The admin of the user’s organization cannot see the role when managing the user, but the admin of the role’s organization can, and permissions associated with the role are properly enforced.
1. Log in as a user with administrative privileges for the role’s organization.
2. Select Manage Roles or, on the Admin Home page, click Roles.
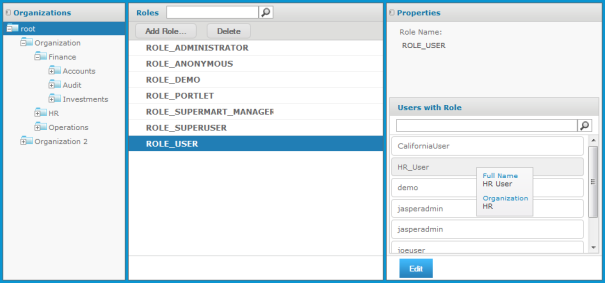
As shown in See "Manage Roles Page", the Manage Roles page displays the roles in each organization and properties for each role.
|
|
The list of roles includes all roles in the chosen organization and its suborganizations. The list of roles also includes the five default system-level roles. The same role name may appear more than once, indicating that roles with the same name were created in different organizations. The second column (blank in this figure) gives the organization name of a particular role.
In this example, the system admin can see all roles in all organizations by selecting the root of the Organization hierarchy.
3. To select a role, click its organization in the Organizations panel, then click the role in the Roles panel.
To filter the list of roles, enter a search string in the Search field of the Roles panel. The search results show all of the roles in the selected organization and suborganizations whose name contains the search string. If necessary, scroll through the new list or refine your search.
To stop the search, click ![]()
4. Select the role in the Roles panel. The role’s properties appear in the Properties panel.
The Properties panel shows the role name, the organization where it is defined, and the list of users to whom the role has been assigned. The list of users shows only their user IDs, but hovering over an ID displays a tooltip with the full name and organization, as shown in See "Manage Roles Page".
|
|
When you view the properties of the special system-level roles, you only see the users with this role in your organization or any suborganization. An organization admin can never see users outside of his organization or its suborganizations. |
1. Log in as a user with administrative privileges for the organization in which the role will be used.
2. Select Manage Roles or, on the Admin Home page, click Roles.
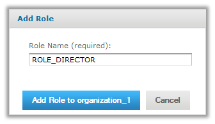
3. In the Organizations panels, select the organization to which the role will belong, then click Add Role.
The Add Role dialog appears.
|
|
|
Adding a Role |
4. Enter the name of the role. Roles have no other properties or settings.
5. Click Add Role to <organization> to create the role.
The new role appears in the Roles panel, unless you entered a search term that excludes it. If you want to assign users to the role, click Edit in the Properties panel of the new role, as shown in the following section.
The management interface for roles lets you assign multiple users to one role. To assign multiple roles to a single user, edit the user’s properties with the procedure in section Editing a User.
1. Log in as a user with administrative privileges for the organization in which the role is defined.
2. Select Manage Roles or, on the Admin Home page, click Roles.
3. In the Organizations panels, select the role’s organization, then select the role in the Roles panel.
|
|
Unless you are logged in as the system admin, you cannot edit or delete the five special system-level roles. |
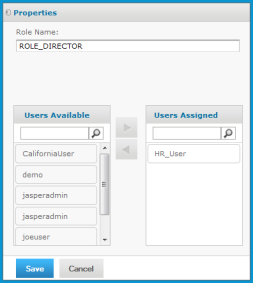
4. In the Properties panel, click Edit.
The role’s properties become editable. You can change the role name and the users assigned to it.
|
|
|
Editing the Members of a Role |
5. Enter a different name to change the role name throughout the server.
|
|
Permissions in the repository that use the role name are automatically updated. However, role names in security files for Domains and OLAP are not updated with the new role name and may cause a security risk. If you use security files for Domains or OLAP, do not change role names without verifying the files as well. For more information, see the JasperReports Server User Guide. |
6. To assign or remove users from the role, select the users, and click the arrow buttons between the Users Available and Users Assigned lists.
7. Click Save to keep your changes, or Cancel to quit without saving.
1. Log in as a user with administrative privileges for the organization in which the role is defined.
2. Select Manage Roles or, on the Admin Home page, click Roles.
3. In the Organizations panels, select the role’s organization, then select the role in the Roles panel. Use Control-click and Shift-click to make multiple selections.
|
|
Unless you are logged in as the system admin, you cannot edit or delete the five special system-level roles. |
4. In the tool bar of the Roles panel, click Delete and confirm the action.