![]()
You should advise your users to change their passwords regularly. To configure periodic expiration of their passwords, refer to the JasperReports Server Administrator Guide.
As with organizations, system admins can manage all users in all organizations, as well as create users outside of organizations, as described in section Delegated Administration. Organization admins can manage only the users in the organizations they administer.
The default installation of JasperReports Server contains the following users:
|
User Name |
Default Password1Passwords are case-sensitive. |
Organization |
Description |
|
superuser |
superuser |
none |
Default system admin. |
|
anonymousUser |
anonymoususer |
none |
Allows anonymous login; disabled by default. |
|
jasperadmin |
jasperadmin |
Organization |
Default organization admin in every organization. |
|
joeuser |
joeuser |
Organization |
Default end user in every organization. |
|
demo |
demo |
Organization |
Included for use with sample data. |
|
CaliforniaUser |
CaliforniaUser |
Organization |
Included for use with sample data. |
|
|
You should advise your users to change their passwords regularly. To configure periodic expiration of their passwords, refer to the JasperReports Server Administrator Guide. |
1. Log in as a user with administrative privileges for the user’s organization.
2. Select Manage Users or, on the Admin Home page, click Users.
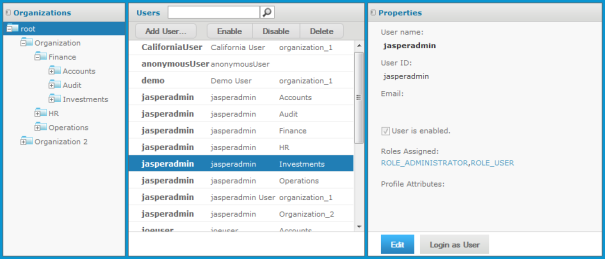
As shown in See "Manage Users Page", the Manage Users page displays the users in each organization and properties for the selected user.
|
|
The list of users includes everyone in the chosen organization and its suborganizations. The same user ID may appear more than once in the Users panel, indicating that users with the same ID were created in different organizations. The third column gives the organization name of a particular user.
In this example, the system admin can see all users in all organizations by selecting the root of the Organization hierarchy. There are always multiple jasperadmin users in a hierarchy of organizations, because it is the default administrator ID in each organization that is created.
3. To locate a user:
• To browse for users, expand the organization hierarchy in the left-hand panel, and select an organization. Scroll through the list of users, or choose a suborganization to reduce the list.
• To search for a specific user, select the organization (or any parent organization) and enter a search string in the Search field of the Users panel. The search results show all users in the selected organization and suborganizations whose username contains the search string. If necessary, scroll through the results or refine your search.
To stop the search, click ![]()
4. Select the user in the Users panel. The user’s properties appear in the Properties panel.
The properties include the user’s name, user ID, email address, assigned roles, user status, and profile attributes. User status can be Enabled or Disabled; disabled users are displayed in gray text in the list of users. Profile attributes are special user attributes that are added directly in the database, not through this Manage Users page (see JasperReports Server Ultimate Guide). For convenience, the role names link to the role management page for each role.
|
|
As the admin of a given organization, you can see the roles defined in your organization and its suborganizations but not the parent organization (except for certain system-wide roles). A user may have roles defined and assigned from a parent organization that are not visible to the administrator of the user’s organization. For more information, see section Managing Roles. |
1. Log in as a user with administrative privileges for the organization to which the user will belong.
2. Select Manage Users or, on the Admin Home page, click Users.
3. In the Organizations panels, select the organization to which the user will belong, then click Add User.
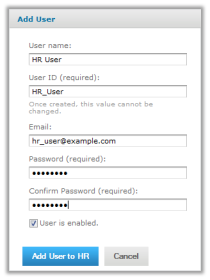
The Add User dialog appears.
|
|
|
Adding a User |
4. Enter the following information:
• User name – The full name of the person associated with the user account. The name is optional but recommended; it can be in any format or convention. JasperReports Server always displays the current user’s name in the top right-hand corner of the screen.
• User ID – Generated automatically from the user name; you can accept the suggested value or type your own. The user ID is used to log into JasperReports Server, and for administrators to manage users and resources. User IDs must be unique within an organization, but may exist in other organizations.
• Email – The email address of the person. The email is optional but the address must be in a valid format.
• Password and confirmation – Enter the same password in both fields.
• User is enabled – Select the checkbox to enable the user right away.
Users that are not enabled cannot log in. JasperReports Server automatically assigns every user the default role, ROLE_USER, but you might want to delay enabling the user until you assign more roles. For more information on roles, see section Managing Roles.
5. Click Add User to <organization> to create the user.
The new user appears in the Users panel, unless you entered a search term that excludes it. If you want to assign roles to the user, click Edit in the Properties panel of the new user, as shown in the following section.
One way to assign roles is to add available roles to a given user. Alternatively, when you edit roles, you can assign any number of users to a given role.
1. Log in as a user with administrative privileges for the user’s organization.
2. Click Manage Users or, on the Admin Home page, click Users.
3. In the Organizations panel, select the user’s organization, then in the Users panel, select the user.
The user is displayed in the Properties panel.
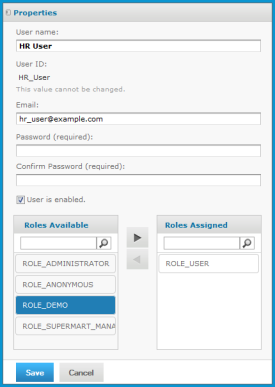
4. In the Properties panel, click Edit.
|
|
5. Modify the user name, email, password, and enabled status as needed.
You cannot edit the user ID or the profile attributes. The user ID always has the value defined when the user is created originally; the profile attributes can only be modified in the database (see the JasperReports Server Ultimate Guide).
6. To assign or remove roles from the user, select the roles, and click the arrow buttons between the Roles Available and Roles Assigned lists.
The Roles Available list includes any role in the organizations of the current administrator, as well as the special system-wide roles. For more information on creating and adding roles, see section Managing Roles.
7. Click Save to keep your changes, or Cancel to quit editing without saving.
8. In the Properties panel, click Login as User to test the user’s permissions, as explained in section Testing User Permissions.
Logging in as another user is also necessary when you are maintaining resources that use absolute references in the repository. For more information, see section Referencing Resources in the Repository.
Administrators sometimes need to prevent users from logging in by disabling the user accounts. For example, when performing configuration changes, you may want to lock out all users until the changes are finished. Bulk operations let administrators select any number of users, and superuser can select all users in the server, except himself.
1. Log in as a user with administrative privileges for the users’ organization.
2. Click Manage Users or, on the Admin Home page, click Users.
3. In the Organizations panel, select the users’ organization; to enable or disable users in different organizations, select the common parent organization.
4. In the list of users, select all the users to enable or disable. Use Control-click and Shift-click to make multiple selections. If the list of users is too long, enter a search term to find users and enable or disable them individually.
5. Click Enable or Disable in the menu bar.
1. Log in as a user with administrative privileges for the user’s organization.
2. Click Manage Users or, on the Admin Home page, click Users.
3. In the Organizations panel, select the user’s organization; to delete multiple users in different organizations, select the common parent organization.
4. In the list of users, select the user to delete. Use Control-click and Shift-click to make multiple selections. If the list of users is too long, enter a search term to find and select the user.
5. In the tool bar of the Users panel, click Delete and confirm the action.