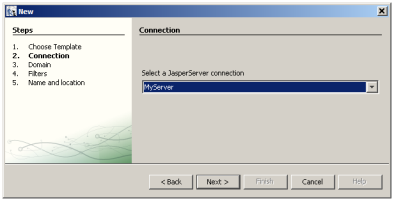
Connection Step in the iReport Domain Report Wizard
To run a report on the server using all the export options set in iReport:
1. Right-click a report in the repository tree and click Run JasperServer Report.
2. If the report has input controls, the Report Parameters dialog prompts you for values:
The report is displayed in the report viewer. If the report does not appear, look for errors or messages in Report Problems at the bottom of the iReport console.
A Domain is a virtual view of a data source that represents the data in business terms appropriate to your audience. A Domain restricts access to data that is inappropriate for your audience. For more information about Domains, see Creating Domains.
The Domain plug-in enables iReport users to generate reports from Domains.
To open the Domains Window:
1. Connect to the server from iReport as described in section Connecting to the Server from iReport.
2. Click Window Domains.
The Domains Window appears on the left-hand side of the screen.
To create a report in iReport based on a Domain in the server:
3. To start a report based on a Domain, in iReport, click File New.
4. In the New file window, click Domain Report.
5. Accept the default, Blank A4, for the report size, and click Finish.
The Domain Report wizard opens to the Connection step:
|
|
|
Connection Step in the iReport Domain Report Wizard |
6. Select a connection to a JasperReports Server, then click Next.
The Domain step displays a selector containing all the Domains within the repository visible to the user defined in the connection.
|
|
If the user’s organization includes a sub-organization, the list includes any Domains in the sub-organization as well. |
7. Select a Domain. For example, accept the default Domain, Simple_Domain, and click Next. The Filters step displays the Domain’s items, which may correspond to fields and calculated fields in the Domain.
8. Define any necessary filter conditions to apply to the fields of the Domain. For example, expand Opportunities, double-click Amount. In the Condition editor, select is Greater than or equal to. Enter the value 10000, as shown in See "Filters Step in the iReport Domain Report Wizard", and click Add/Update condition. Even if that field is not included in the report, the filter is active and is applied to the rows of data that appear.
|
|
Filters limit the data the report returns, and you may select any field to prompt the user with an input control. This page is similar to the Filters page in the Data Chooser wizard within the server. For more information, see section The Pre-filters Page. |
|
|
9. Click Next. In the Name and Location step, enter a name and a location on the hard drive to save the report.
The Name and Location step determines the file name of the report in iReport, not in the JasperReports Server repository. Perform See "When you are satisfied with the report, save the report, then click Publish Report in the Domain window." to See "Select a valid repository location and click Finish." to publish the report in the repository.
10. Click Finish.
The report document appears in design area. The Domain Window now shows the sets and items in the Domain.
11. Drag items from the Domains Window to the detail area of the JRXML in the designer to add them to the report, as shown in See "Using a Domain on the Server from iReport". Edit the report to format its data and its look and feel.
|
|
If you want to change the filters on the Domain data, click Edit Filters in the Domains Window. Filters are defined as queryFilterString elements in the XML of the report. Click XML next to Designer to view the XML.
For the simple filter shown in See "Define any necessary filter conditions to apply to the fields of the Domain. For example, expand Opportunities, double-click Amount. In the Condition editor, select is Greater than or equal to. Enter the value 10000, as shown in See "Filters Step in the iReport Domain Report Wizard", and click Add/Update condition. Even if that field is not included in the report, the filter is active and is applied to the rows of data that appear.", the following XML is generated:
|
<queryString language="domain"> <![CDATA[<query> <queryFields> <queryField id="newSet2.amount"/> </queryFields> <queryFilterString>newSet2.amount >= 10000</queryFilterString> </query>]]> </queryString> |
The query has two elements: queryFields and queryFilterString:
• Field IDs in both elements are specified as set_ID.field_ID.
• The filter uses the Domain Expression Language described in section The DomEL Syntax.
12. When you are satisfied with the report, save the report, then click Publish Report in the Domain window.
You are prompted for a name, label, and description of the new report unit.
13. Enter a name (object ID), label (display name), and an optional description for the report in the repository, then click Next.
You are prompted for a location for the report unit.
14. Select a valid repository location and click Finish.
15. If the report doesn’t appear in the repository tree, right-click the server name and click Refresh.
16. With the report published to the server, you can test it by clicking ![]() in the repository navigator window.
in the repository navigator window.
The report output appears in the Report Viewer Window.
|
|
You cannot run a Domain report until it has been published to the server. |